Intro
AI video tools are genuinely exciting, but most beginners get stuck at the practical stage. You know you want to make a video, yet the questions pile up. Where do you start? How do you sign up? Where do you type the prompt? How do you add a reference? Which settings matter, and how do you get the final file?
I hit the same wall, so I tested Seedance 2.5 on Topview from a fresh account and noted every step. This guide walks through the full process with real images, from the first click to downloading your MP4.
Seedance 2.5 is available on Topview, and it is built across all the tools on Topview, so you are not limited to one narrow feature. At the time of writing, Topview is running an offer of 30 days of Unlimited Seedance 2.5 Generation along with an 80% off promotion. Offers change often, so confirm the current details on Topview before buying or publishing commercially.
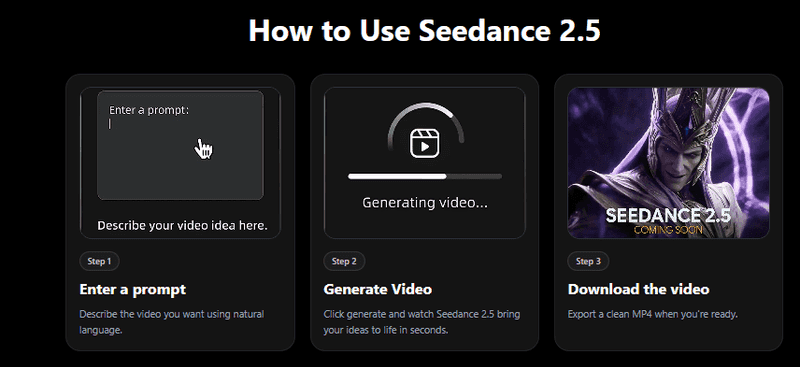
A simple overview of the Seedance 2.5 workflow. Enter your idea, generate the video, and download the final MP4.
This image shows the basic journey in three steps. You start with a prompt, Seedance 2.5 generates the video, and then you export the result. The real quality, though, comes down to how clearly you write the prompt and how carefully you pick your references and settings. A rushed one-line prompt and a thoughtful, detailed one will not give you the same output.
What Is Seedance 2.5?
Seedance 2.5 is an AI video generation model. In plain terms, you describe what you want, optionally add a reference image or a short storyboard, and the model turns that into a moving video clip.
The All-in-One Platform for Effective SEO
Behind every successful business is a strong SEO campaign. But with countless optimization tools and techniques out there to choose from, it can be hard to know where to start. Well, fear no more, cause I've got just the thing to help. Presenting the Ranktracker all-in-one platform for effective SEO
We have finally opened registration to Ranktracker absolutely free!
Create a free accountOr Sign in using your credentials
What makes it practical is length. A lot of AI video tools produce very short test clips that look nice for two or three seconds and then stop before anything really happens. Seedance 2.5 can generate up to 30 seconds, and that extra room changes what you can actually make. Thirty seconds is enough for a hook, a setup, some action, a result, and a closing call to action.
On Topview specifically, Seedance 2.5 is not tucked away in one isolated feature. It is available across the Topview tools, so you can reach for the same model inside different video workflows depending on what you are creating, whether that is a product ad, an avatar explainer, or a social clip.
I find it helps to see how it lines up against other models before committing time to it.
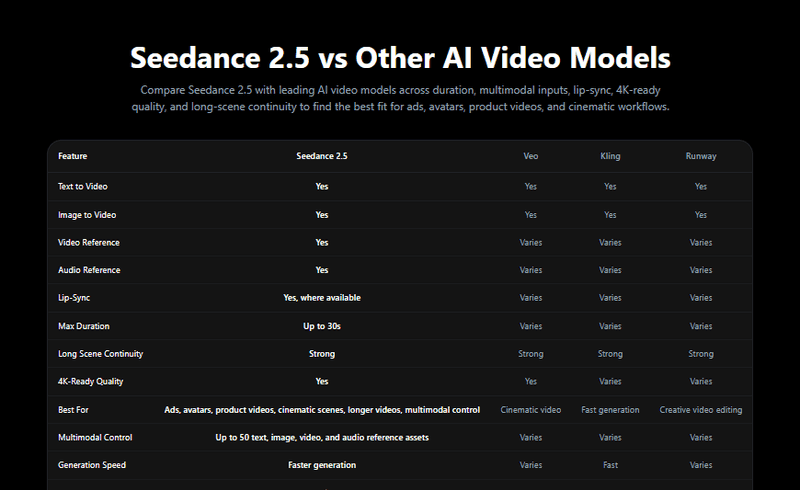
How Seedance 2.5 compares with other AI video models across duration, inputs, lip sync, and quality.
This comparison gives a quick sense of where Seedance 2.5 fits. It supports text to video and image to video, handles video and audio references, offers lip sync where available, and generates up to 30 seconds. Treat any comparison like this as a starting point rather than a guarantee, since model features and limits get updated over time. When a column says something varies, it usually means the result depends on your inputs and the specific settings you choose.
Why the 30-Second Format Matters
Short clips are fine for testing, but they often end right when the video is getting interesting. You get a pretty shot and no story.
The All-in-One Platform for Effective SEO
Behind every successful business is a strong SEO campaign. But with countless optimization tools and techniques out there to choose from, it can be hard to know where to start. Well, fear no more, cause I've got just the thing to help. Presenting the Ranktracker all-in-one platform for effective SEO
We have finally opened registration to Ranktracker absolutely free!
Create a free accountOr Sign in using your credentials
A product ad is a good example. It needs time to show the product, hint at the problem it solves, show it being used, land the benefit, and then close with a call to action. Try to do all of that in five seconds and it feels rushed.
The same logic applies elsewhere. A tutorial needs a start, at least one clear step, and a result. An avatar explainer needs enough room to finish one point without cutting off mid sentence. A social video still needs a hook at the front and a payoff at the end, even if the whole thing is quick.
| Video Type | Why 30 Seconds Helps | Example Use |
| Product ad | Room for the hook, product use, and CTA | Skincare product demo |
| Tutorial | Shows the start, the action, and the result | Desk setup transformation |
| AI UGC video | Feels more complete and natural | Creator-style product review |
| Avatar explainer | Lets one idea be explained fully | Software feature explanation |
| Social video | Leaves space for a hook and a payoff | Before and after clip |
Step 1: Open Topview and Choose Seedance 2.5
Start by opening Topview and heading to the Seedance 2.5 tool, or whichever Topview video tool you want to work in. Because Seedance 2.5 is available across all tools on Topview, you may run into it inside several different creation workflows. The exact entry point depends on the kind of video you are trying to make.
When you open the generator, the first thing to sort out is the model and the input mode.
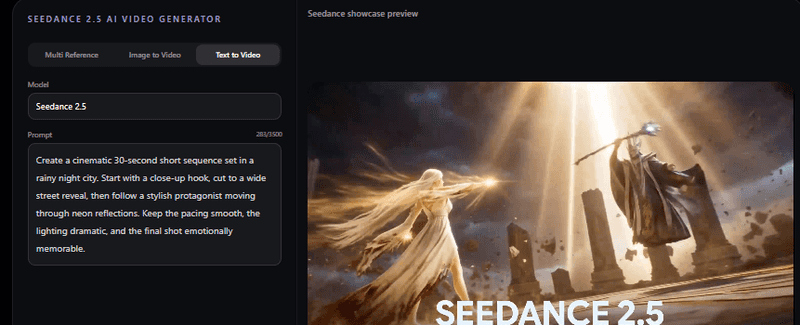
The Seedance 2.5 AI video generator on Topview, with the model selected and the input mode set to Text to Video.
Here you can confirm that the model is set to Seedance 2.5 and pick how you want to feed it. Multi Reference lets you guide the output with several assets, Image to Video animates a still you provide, and Text to Video builds the clip from your written prompt alone. The preview area on the right is just a showcase. Your own result will appear once you generate it.
After you have the mode set, you will see the full creation panel with all the controls.
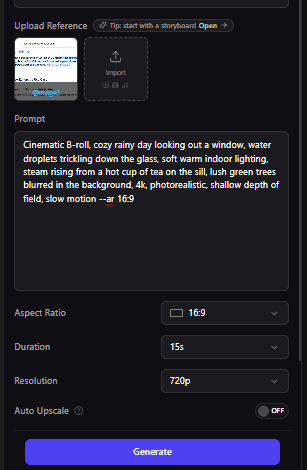
The Seedance 2.5 creation panel on Topview, where you add references, write your prompt, choose settings, and generate the video.
This is the main working screen. From here you can upload a reference image or storyboard, write your prompt, set the aspect ratio, choose the duration, pick the resolution, decide whether to use auto upscale, and then click Generate. Let me break down each option in plain language.
What each option means
**Upload Reference: **Use this when you want the video to follow a specific image, product, scene, character, or storyboard. For ecommerce, upload the actual product photo so the bottle, box, or label stays close to the real thing. For storytelling, upload a scene or a style reference that captures the look you want.
**Prompt: **This is where you describe the video. A strong prompt usually covers the subject, the scene, the action, the mood, the camera movement, the rough duration, and how it should end.
**Aspect Ratio: **16:9 is the landscape shape and suits YouTube, website videos, and landscape ads. 9:16 is the vertical shape and is usually the better choice for TikTok, Instagram Reels, YouTube Shorts, and mobile-first campaigns, where that option is available.
**Duration: **The image shows 15s selected. Shorter durations are handy for quick tests, while Seedance 2.5's longer 30-second generation is where you get room for a full ad, explainer, or tutorial. Pick short when you are still experimenting and longer when the idea needs a complete arc.
**Resolution: **The panel shows 720p, which is fine for testing motion and checking that the concept works. For final publishing, step up to a higher resolution where it is available.
**Auto Upscale: **Upscaling can improve the final look, but it is worth testing whether it affects generation speed, output quality, or your plan limits before you rely on it for everything.
**Generate Button: **Once references, prompt, and settings are ready, click Generate and wait for the result.
Step 2: Create or Log In to Your Topview Account
Before you can generate or export, you will usually need to be logged in. If you already have a Topview account, signing in takes a few seconds.
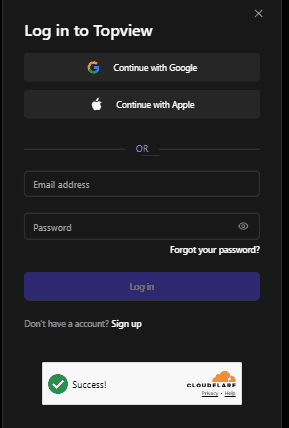
The Topview login screen, where existing users can sign in with Google, Apple, or email.
If you already have an account, log in here. You can continue with Google, continue with Apple, or enter your email and password. If you do not have an account yet, click Sign up to create one. That is the path the next few steps follow.
Step 3: Sign Up With Email
If you are new to Topview, signing up is straightforward. You can register with Google, Apple, or a regular email address. I used the email option so I could show the full flow.
The Topview signup screen, where new users can create an account with an email address.
To start, type your email address into the field and click Sign up. This kicks off account creation.
Step 4: Enter the Verification Code
After you submit your email, Topview sends a verification code to confirm it is really yours. You enter that code on the next screen.
This step proves you own the email address. The code arrives by email, usually within a minute or two. If it does not show up quickly, check your spam and promotions folders, or wait a short while before requesting a new one. The email field here is blurred for privacy, and you should do the same with yours.
Step 5: Check Your Email for the Topview Code
Open your inbox and look for the email from Topview. Inside, you will find a numeric verification code.
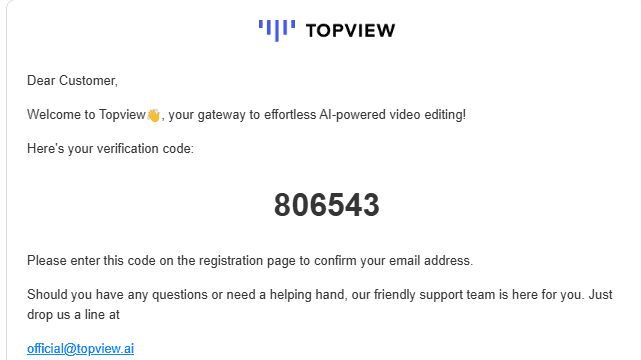
Topview sends a verification code by email during signup.
Copy the code from the email and paste it into the verification box back on Topview to continue.
Step 6: Set Your Password and Finish Signup
Once your email is verified, Topview asks you to set a password. Choose a strong one, finish the signup, and you are in.
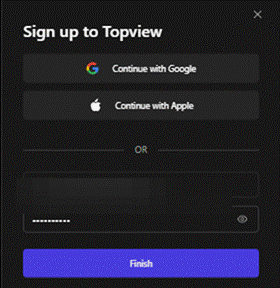
After email verification, you create a password and finish setting up your Topview account.
Enter a strong password and click Finish to complete the account setup. With that done, you can head back to the Seedance 2.5 workflow and start generating videos. The email field is blurred here as well.
Step 7: Upload a Reference Image or Storyboard
Now back to the creation panel from Step 1. The Upload Reference option is one of the most useful tools for getting predictable results, because a reference gives the model something concrete to follow.
A few examples of when a reference helps:
-
A product photo for an ecommerce video, so the item looks like the real product.
-
A storyboard image for a planned ad, so the layout matches your idea.
-
A character reference, so a person or avatar stays consistent across the clip.
-
A style reference, so the lighting and mood land the way you want.
-
A scene reference, when you are after a particular cinematic look.
In my experience, a clear reference usually points the model in a better direction than a vague text prompt on its own. If accuracy matters, lead with a reference.
Step 8: Write a Strong Seedance Prompt
The prompt is the single most important part of the whole process. This is where most of your control lives, so it is worth slowing down here.
A simple formula I keep coming back to:
Subject + Scene + Action + Mood + Camera Movement + Duration + Ending + Things to Avoid
Here is an example prompt built that way:
Create a 30-second vertical AI video for a modern skincare product. Start with a close-up of the bottle on a clean bathroom counter with soft morning light. Show water droplets on the surface, then move into a smooth slow-motion shot of someone picking up the product and applying it gently. Keep the product label clear, the bottle shape consistent, and the background minimal. End with a clean hero shot with space for text on the right side. Use soft lighting, realistic skin texture, and smooth camera movement, and avoid distorted hands, unreadable text, or random background changes.
Why this prompt works:
-
It names the subject clearly.
-
It gives a beginning, a middle, and an ending.
-
It describes the mood and the camera movement.
-
It includes consistency instructions for the product.
-
It tells the model what to avoid, which is just as important as what to include.
Step 9: Choose Aspect Ratio, Duration, and Resolution
Using the same settings from the creation panel, match your choices to where the video will live.
16:9 works for YouTube, websites, and landscape ads. 9:16 is better for Reels, Shorts, TikTok, and mobile ads, where available. Use 15 seconds for quick tests and 30 seconds for complete ads, explainers, tutorials, and social videos. Start at 720p while you test, then move to a higher resolution for the final export if your plan offers it.
| Setting | Best For | Beginner Tip |
| 16:9 | YouTube and website videos | Good for landscape placements |
| 9:16 | Reels, Shorts, and TikTok | Best for mobile-first social content |
| 15s | Quick concept testing | Use it while you refine prompts |
| 30s | Complete short videos | Best for ads and explainers |
| 720p | Drafts and tests | Check the motion before upscaling |
| Higher resolution | Final export | Use it for publishing when available |
Step 10: Click Generate and Review the Video
Once everything is set, click Generate. Generation can take a little time, and how long depends on the clip length, the resolution, how busy the platform is, and your account plan. Longer, higher-quality videos naturally take longer.
When the video is ready, watch the whole thing, not just the opening few seconds. AI clips often look great at the start and then drift later on, so the ending deserves as much attention as the hook. If something feels off, it is usually faster to adjust the prompt and regenerate than to try to fix it after export.
Step 11: Download the Final Video
After the video is generated and you have reviewed it properly, you can download it. Export a clean MP4 when you are happy with the result.
Before you download, and especially before you use the clip commercially, run through a quick checklist:
-
Motion quality and whether the movement looks natural.
-
Product accuracy, so the item matches the real thing.
-
Faces and hands, which are common weak spots in AI video.
-
Text and logos, since AI can garble letters and brand marks.
-
Audio timing, if your clip has sound.
-
Lip sync, if a person or avatar is speaking.
-
The CTA frame, so your closing message is clear.
-
Watermark rules and export limits on your plan.
-
Commercial usage rights for the final video.
AI video is a strong starting point, not a finished product you should publish blindly. A short review pass saves you from putting out a clip with a six-fingered hand or a smeared logo.
My Practical Tips for Better Seedance 2.5 Results
After running a batch of prompts through Seedance 2.5, here is what consistently made my results better.
Start with one clear idea. A single, focused concept beats a crowded scene every time. Do not overcrowd the frame with too many subjects or actions at once, since that is where things tend to break down.
This becomes even more important as Seedance 2.5 support expands to Topview Canvas and Topview Drama Studio, where creators may use the same model for more structured, multi-step creative workflows.
Use references when accuracy matters, particularly for products and recurring characters. Keep the prompt specific but readable, and do not bury the model in contradictory instructions. Always state how the clip should end, because a defined ending gives the video a sense of completion.
The All-in-One Platform for Effective SEO
Behind every successful business is a strong SEO campaign. But with countless optimization tools and techniques out there to choose from, it can be hard to know where to start. Well, fear no more, cause I've got just the thing to help. Presenting the Ranktracker all-in-one platform for effective SEO
We have finally opened registration to Ranktracker absolutely free!
Create a free accountOr Sign in using your credentials
Add negative instructions too, such as avoid distorted hands or unreadable text. Test in a lower resolution first if that option is available, so you are not waiting on full-quality renders just to check the motion. Review the entire video before publishing. And reach for the 30-second length only when the idea genuinely needs a full arc, not just because it is available.
Best Use Cases for Seedance 2.5 on Topview
Seedance 2.5 is most useful when a clip benefits from a bit of length and a clear structure. In practice that covers a lot of ground:
-
Product ads and ecommerce demos.
-
AI UGC-style videos that feel like a real creator review.
-
Social media clips for Reels, Shorts, and TikTok.
-
Avatar explainers and short tutorials.
-
Fashion and beauty videos.
-
Music visuals and short brand videos.
-
Cinematic, story-driven shots.
Because Seedance 2.5 is available across all tools on Topview, you can try it in different workflows depending on your content goal, rather than learning a separate tool for each format.
Current Topview Offer for Seedance 2.5
At the time of writing, Topview is promoting Seedance 2.5 with 30 days of Unlimited Seedance 2.5 Generation, plus an 80% off promotion.
For anyone testing the model seriously, that kind of offer is genuinely useful. Unlimited generation for a month gives you room to try many prompts, swap references, test different video styles, explore product angles, and compare formats without watching a credit counter the whole time.
Important: promotions change. Confirm the current offer, the exact terms, and what unlimited includes directly on Topview before you purchase. Do not make buying decisions, or claims in your own content, about pricing, plan limits, or commercial rights unless you have verified them on Topview first.
Final Thoughts
Here is the whole process in one quick recap:
-
Open Topview.
-
Choose Seedance 2.5.
-
Sign up or log in.
-
Upload a reference.
-
Write a clear prompt.
-
Choose your settings.
-
Generate the video.
-
Review it carefully.
-
Download the final MP4.
Seedance 2.5 is useful because it gives AI video more room to feel complete. The 30-second format is especially helpful for product ads, tutorials, AI UGC videos, and social content, where a few extra seconds make the difference between a clip that lands and one that cuts off too early.
Since Seedance 2.5 is available on Topview and across the Topview tools, it is easier to test different creative workflows from one place. The 30 days of Unlimited Seedance 2.5 Generation and the 80% off promotion make it easier to experiment as well, but check the latest terms directly on Topview before you count on the offer. And whatever you make, give it a proper review before it goes live.